Posted on Leave a comment

Four Ways of Running Spooky2 Biofeedback Scans

Spooky2 Biofeedback Scan is a powerful tool for listening to your body and discovering what frequencies are best suited for you. To suit people with different needs, there are currently four ways to run biofeedback scans.

Pulse Scan

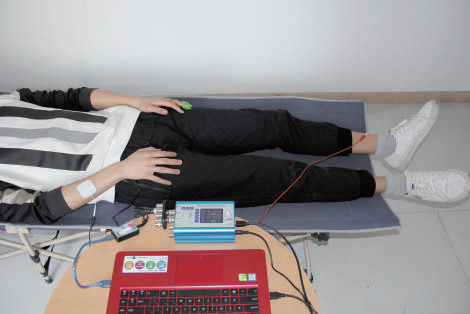
The Pulse Scan uses changes in the heart rate to monitor the body’s response to a particular frequency.

When a frequency stresses your body, it will be shown as an increase in your heart rate during a pulse scan. On the other hand, a decrease in your heart rate indicates that a frequency has calmed your body by sharing the same energy property.

With Spooky2 Pulse, if you run a frequency scan and one or more of its frequencies produce sympathetic resonance with pathogens or parasites, the subject will always have a low level of stress response. These subtle changes are immediately and recorded by Spooky2 Pulse’s heart rate monitor.

When the scan is complete, Spooky2 Pulse will then go through its list of “hits” and sweep carefully around them to find the exact frequencies that produce these tiny stress reactions.

Advantage VS disadvantage

You can run Pulse Scan with both XM Generator and GeneratorX. The choice is up to you. In terms of effectiveness, a Pulse Scan is suitable for scanning your whole body. However, Pulse Scan lasts about 40 minutes, and it relies on the changes in heart rates. Any form of body movement will cause heart rate fluctuations, even if it is a sneeze.

Therefore, we recommend that you stay still to get more accurate results. Most people find it not quite convenient when following this requirement.

Preparations for Pulse Scan:

Detailed steps to do a Pulse Scan: https://www.youtube.com/watch?v=nOgvVFSgoyE

GenX Scans

Currently, there are three types of GenX Scans using different Spooky2 accessories, which respectively are GX TENS Scan (using TENS pads), Sample Scan (using Sample Digitizer) and Scalar Scan (using Spooky2 Scalar).

GenX Scans results record the changes of electrical signals. If there is a frequency resonating with a pathogen in your body, a subtle change in the electrical pattern will demonstrate a hit is detected and recorded in the scan result.

Advantages vs. disadvantages

On average, the running time for a GenX Scan is about 6 minutes, and the scan results are usually more accurate. GenX Scan is more suitable for local scans compared with Pulse Scan.

GX TENS Scan

GenX TENS Scan shares a similar connection and settings with Pulse Scan.

Preparations for GX TENS Scan:

Click to watch the detailed steps of running a GenX TENS Scan: https://www.youtube.com/watch?v=ArxDJO3eyq8

Related blogs:https://www.spooky2-mall.com/blog/what-are-the-differences-between-pulse-scan-and-gx-tens-scan/

Sample BFB Scan

Since there are some inconveniences when running Pulse Scan and GenX TENS scan, we have introduced Sample Scan to avoid any physical limitation. You only need one Sample Digitizer to run Sample BFB Scans.

The working principle of Spooky2 Sample Digitizer is similar to Remote mode and is compatible with direct GenX scanning of biological samples (urine, saliva, blood, etc.). Due to the high ratio of pathogens within the biological sample, Spooky2 Sample Digitizer is better suited than TENS scans for finding pathogens in your body.

However, the effectiveness of using Sample Digitizer to run BFB results is not ideal. For this reason, we recommend using proper Spooky2 Remote, plasma, or contact modes to run your scan results.

Preparations for Sample BFB Scan:

How to Run Sample Digitizer Scan and Run Preset Using Remote:

Related blog:https://www.spooky2-mall.com/blog/spooky2-sample-digitizer-guidelines/

Scalar BFB Scan

Spooky2 Scalar Biofeedback scans are special. The Spooky2 Scalar Digitizer measures tiny changes to the scalar field around you during scalar frequency scans. Frequencies that invoke changes to the scalar field will be recorded. These changes indicate subtle scalar reactions within your body. When you are doing a Scalar Biofeedback scan, only one GX is required since it has two generators in one. Generator 2 modulates the scalar field, and Generator 1 measures the response.

It is best to lie perfectly still when doing a Scalar Biofeedback scan and make sure that you only have one person in the scalar field. To ensure the accuracy of your scan result, please also keep your pets away during the scan.

Preparations for Scalar BFB Scan:

How To Do Scalar Biofeedback Scan Using Spooky2 Scalar Digitizer:

Related blogs:https://www.spooky2-mall.com/blog/new-product-released-spooky2-scalar-digitizer/
Posted on Leave a comment

Experiment to Use Spooky2’s Frequency Water

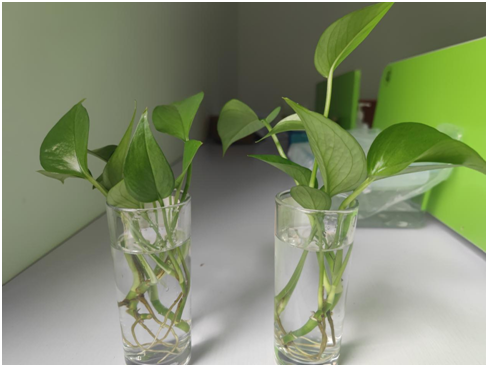
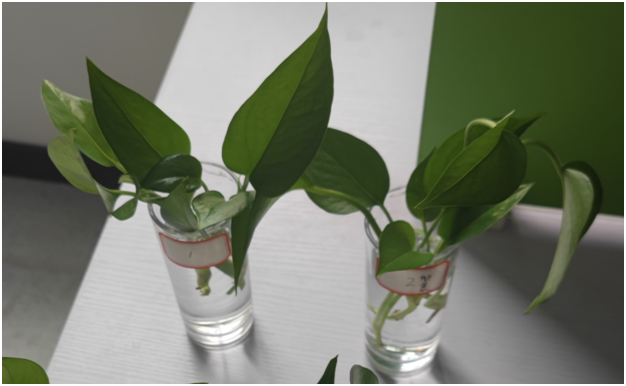
Frequency imprinting is a great way to benefit from frequency. You can use Spooky2 to imprint the frequency into water and drink it during the day instead of using a frequency generator to run the frequency directly on the person. Some people are skeptical about the effectiveness of drinking imprinted water, so Spooky2 chose to experiment with plants. Spooky2 chose the earth’s natural heartbeat frequency of 7.83Hz, imprinted it into the water, and chose two sections of health and growth. Evergreen vines in similar conditions were used as experimental subjects. The experiment started on August 11, 2021. The left bottle was filled with tap water and the right bottle was filled with 7.83Hz imprinted water.

The left bottle contains tap water. The right bottle contains 7.83Hz imprinted water

After changing the water for half a month, we can see that the growth of the two plants is significantly different. The growth of plants nourished by the imprinted water The leaves and rhizomes are more beautiful. The following pictures were taken on August 26.

The left bottle contains tap water. The right bottle contains 7.83Hz imprinted water

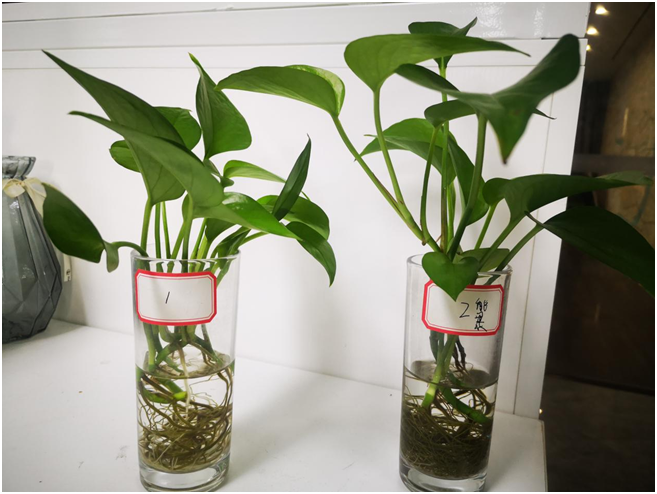
It was not until November 4 that the difference between the two plants became more obvious. The plant on the right has a more luxuriant rhizome, almost 2-3 times that of the left, and the leaves have grown more luxuriant. In summary, this experiment proves that imprinted water does exist and has a positive effect on organisms.

The left bottle contains tap water. The right bottle contains 7.83Hz imprinted water
Posted on Leave a comment

Youtube (Spooky2) Healing Frequency for Eating Disorders

Eating disorders are actually very serious and often lead to fatal diseases. This means that your eating behavior and other related negative thoughts and emotions are severely disturbed. Common eating disorders include anorexia nervosa, bulimia nervosa and binge eating disorder. Eating disorders can affect people of all ages. The researchers found that this may be caused by a complex interaction of genetic, behavioral, and social factors. Fortunately, most people can relieve the symptoms of eating disorders through treatments such as psychotherapy and medication.

The following YouTube frequency video will help relieve mood changes, fatigue, dry skin and yellowing. We recommend listening at least 2-3 times a day, keeping the volume at a comfortable level to prevent any hearing damage and make sure you have enough lemons Water or purified water to flush toxins in your body.

Posted on Leave a comment

How to Create a Spooky2 Preset Chain Program

A preset chain contains a series of presets so you can run killing presets and healing presets in one generator. This blog will show you how to create a preset chain. For example, l would like to use one generator to run an Acne preset first and a Detox preset afterwards. The Acne preset runs for 8 hours, and the Detox preset runs for 16 hours. Finally, set this preset chain to run twice.

Create Presets

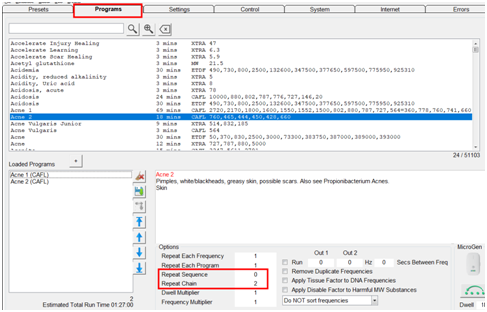
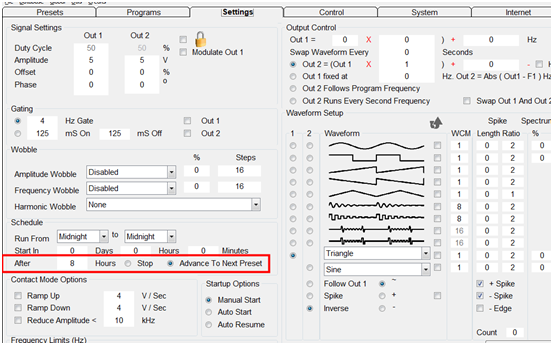
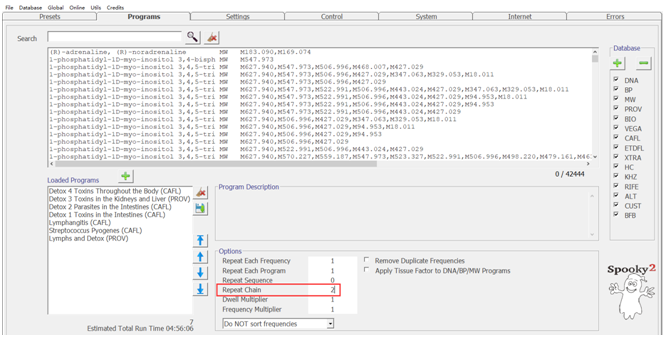
First, create one Acne preset. As I want Acne Remote preset to run for 8 hours and the preset chain to repeat twice, I enter 0 after Repeat Sequence and enter 2 after Repeat Chain. Then go to the Settings tab, enter 8 in the Schedule part. Now I can save the preset named “Acne-Amy”.

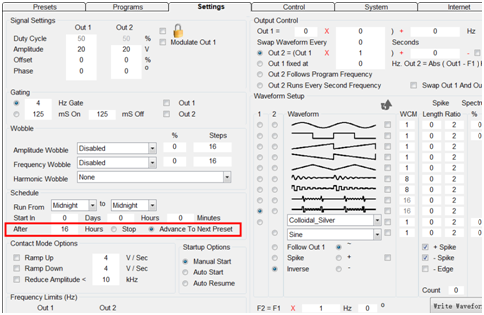
Second, choose one Detox preset. Here, I choose All Maintenance(R) – DB preset and set Repeat Chain to 2 in the Programs tab. I need this preset to run for 16 hours, so I enter 16 after Run for in the Settings tab. And then save this preset named “All Maintenance-Amy”.

Create A Preset Chain

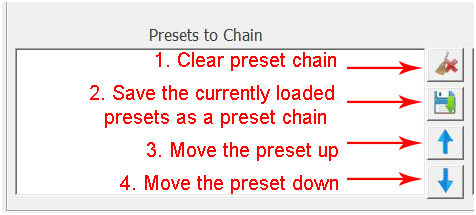
After the presets are created, I can chain them together. Firstly, go to the user directory to find the presets I created. Next is to select them into the Presets to Chain pain. Left-click to choose the first preset and use button or right-click to add it to the pane. This operating way is the same as the following presets.

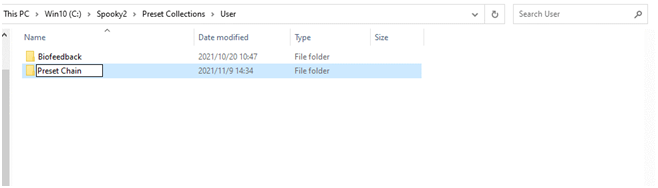
I can save the preset chain after the presets are selected. In order to find my preset chain quickly, I create a new folder for Preset Chain under the User directory.

Debug Preset Chain

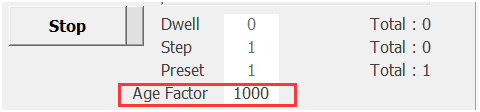
I can use the “Age Factor” to debug the preset chain. First, load the preset chain into the Control tab, and enter the factor here to shorten the total running time. Now I can click “Start” to test this preset chain.

Posted on Leave a comment

Steps to Make Colloidal Silver with Spooky2

Use Spooky2 to follow the simple steps below to create colloidal silver with real nanoparticles with high silver content. The size of the silver particles will be very small and the performance will be extremely ideal.

Step 1: Prepare

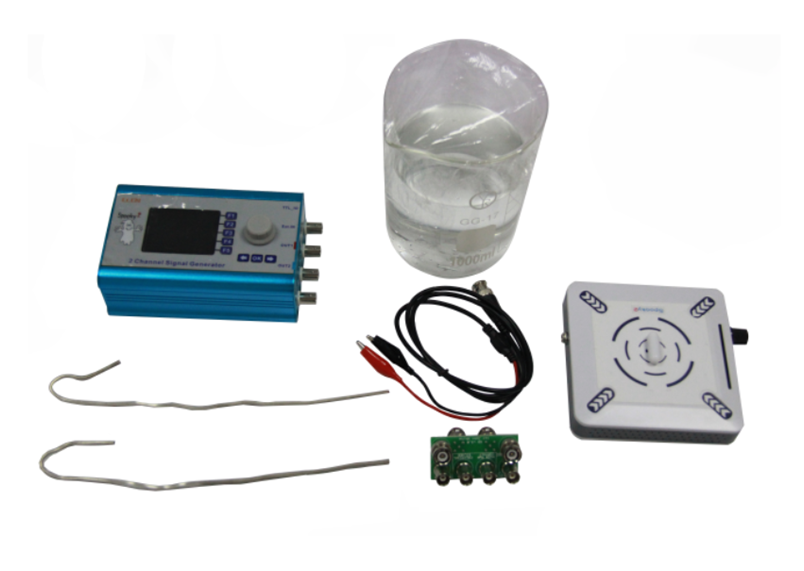
  1. Spooky2-XM generator x1 (including power adapter, USB cable and BNC/Alligator cable)
  2. Spooky Boost v3.0 x1
  3. Silver rod x2
  4. Glass or ceramic container x1
  5. Distilled water
  6. Magnetic stirrer x1

Step 2: Wash

  • Thoroughly clean the silver rod and container.
  • Rinse with distilled water and dry with a napkin.

Step 3: Connect

  1. Fill the container with distilled water, do not use tap water or filtered water. These will almost certainly contain unwanted impurities and chemicals.
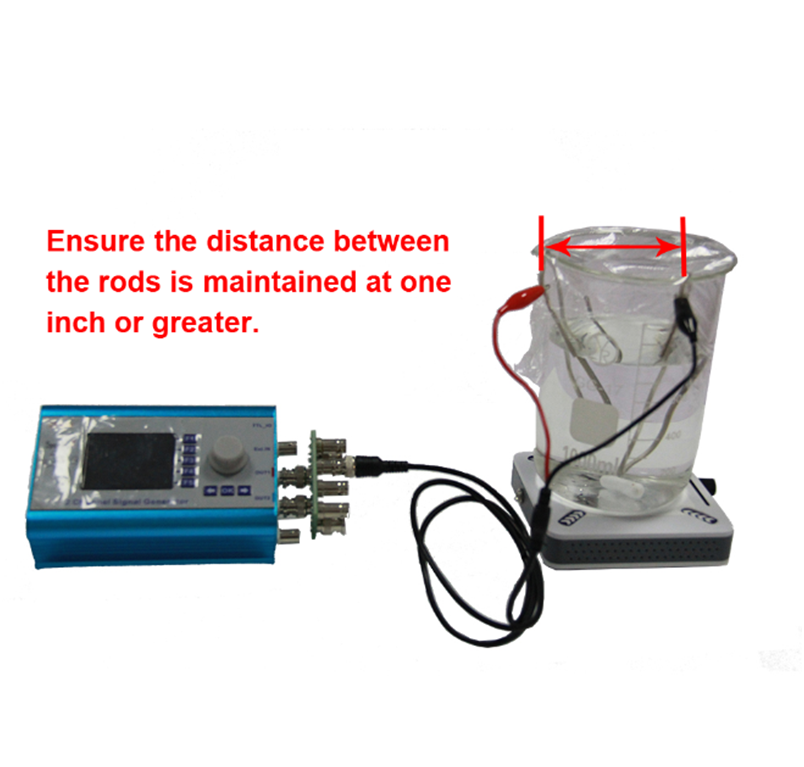
  2. Put two clean and shiny silver rods into the water, making sure that the distance between the rods is one inch or more.
  3. Place the container on the magnetic stirrer and insert the small plastic stirrer.
  4. Clip the alligator clip to the silver rod and insert the other end of the cable into the Spooky Boost accessory.
  5. Cover the container with a lid, such as plastic wrap, to prevent dust from entering the water and causing the water to change color.
  6. Connect the generator to the USB port of the computer and plug in the power adapter.

Step 4: Make

  1. Open the Spooky2-XM generator and start the Spooky2 software.
  2. Click Utilities in the top menu. Select the colloidal/ionic silver calculator and it will open a new window.
  3. Enter the parameters here to calculate the running time of the colloidal silver generation system.
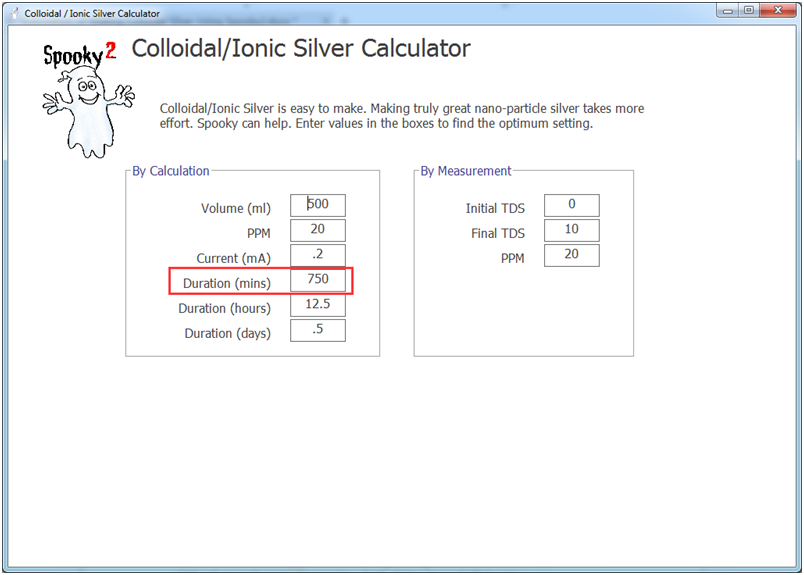
  4. Use the “by calculation” method to calculate the program duration, you can change any field in the calculator. Enter the volume of distilled water, such as 500 ml, and enter PPM, which is one part per million required. We recommend setting it to 20 PPM, which is the setting for most commercial colloidal silver. Enter the current. If you don’t have tools to measure current, or you don’t know how to measure, just enter 0.2mA. This is a very rough average estimate. Suppose you have two 9 AWG rods 1 inch apart, immersed in distilled water. The depth is 12 inches. The total time required to produce the CS will automatically be displayed next to the duration, which is in minutes, hours, and days. Write down the duration in minutes, you will need it later.

5. If you have a TDS meter, you can use the “by measurement” option to make colloidal silver, monitor the TDS reading and enter the value to determine the PPM concentration during the manufacturing process. We do not recommend using the By Measurement field because TDS (total dissolved solids) The meter does not measure the colloidal silver content of the solution, and the colloid is not a dissolved solid.

6. Exit the calculator, go to the Preset tab, then open the Miscellaneous directory, and select Colloidal Silver Generation – JW Preset.

7. Go to the “Program” tab and enter the duration (minutes) calculated from step 3 in the “Stay Multiplier” field.

8. Go to the Control tab, tick Allow generator coverage, select the generator and run the program.

9. Turn on the magnetic stirrer and adjust the gentle movement of the water. The speed is not important.

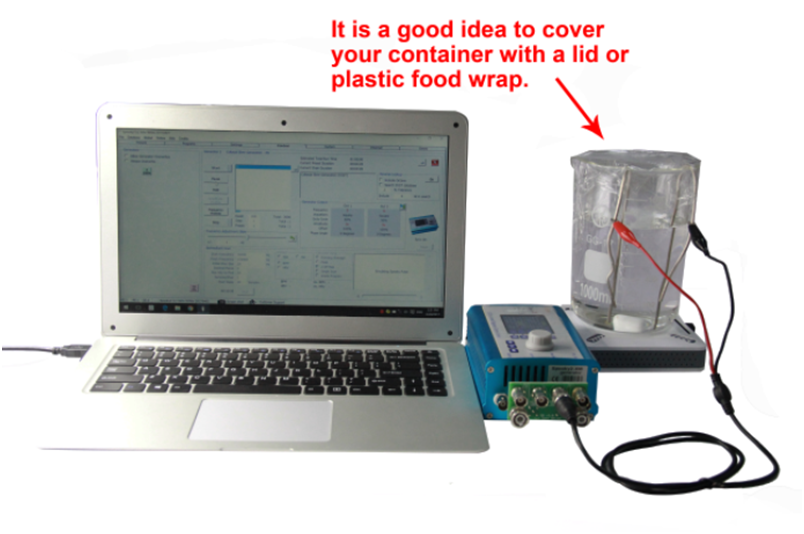
It is a good idea to cover the container with a lid or plastic food packaging to ensure that dust particles in the air do not sink into the water and cause it to change color. Don’t rush the manufacturing process, the slower the better, if the production is slow, the quality of CS will improve. Using cold water, hot water will speed up the process, but the particle size will increase.

When the CS solution is prepared, it may turn pale yellow/gold, which indicates that the particle size is very small. You can irradiate the laser in the solution and see a visible red line, indicating the suspended microscopic silver particles. Store the CS solution in a dark glass container. Plastic and ultraviolet rays from the sun may cause the silver ions to lose their positive charge and accumulate in Together, thus losing its effectiveness.